Coil Installation
Tools required:
7mm, 10mm, 13mm sockets, Torx T-30 driver, flat head screwdriver, and 0.005-0.007 feeler gauges. 12mm wrench (if needed),
1) If applicable, remove the outdrive vent hose fitting from the left side of the cowling. Pull the fitting to straighten it and pull the hose adapter out of the cowling. Remove the two bolts (10mm) on the top of each side of the cowling that hold down the heat sheilds (on the right side it also holds the clamp for the switch wiring harness).
2) Unscrew the two screws holding the face plate with the key switch and pull it out of the way.
3) Remove the 4 fan cage bolts (10mm) and put the cage aside.
4) Use a T30 Torx to remove the 3 black bolts off the debris screen and remove the screen and bracket behind it.
5) Finally, use a 13MM socket to take the 4 nuts off the front of the cowling (the 10mm bolts for the fan cage screw into these). Pull cowling forward and off the motor to expose the fan and coils.
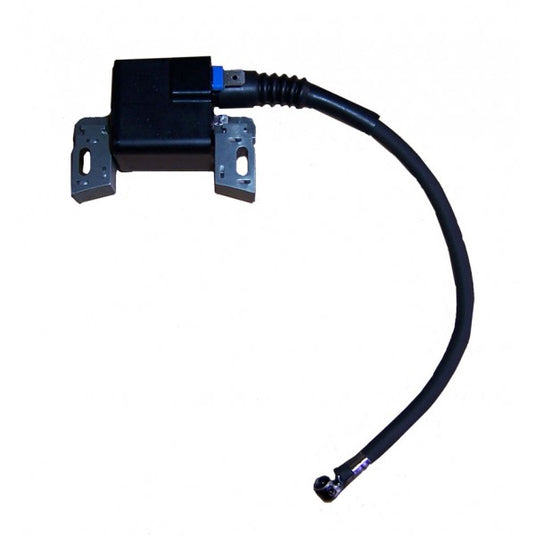
6) There is a magnet on the flywheel which triggers the coils to fire. Turn the flywheel so the magnet is away from the coils. Uplug the plug wires from the spark plugs. Remove the ground wire from the spade connectors on the coils. Use a 7mm socket and remove the two bolts that hold the coil to the block and remove them.
7) To install the new coils, note the indication on the coil which side should be facing out- do not install them backwards. Position the coil on face of the block and reinstall the two small bolts that hold the coil. I use this trick to get the right gap on the coil. Place a 0.005 feeler gauge under the edge of one side of the coil between the coil and flywheel and lightly tighten the bolt to hold the coil in place, do the same on the other side of the coil. Ensure both sides are the same gap. Turn the flywheel so the magnet is under the edge of the coil and check the gap between the edges of the coil and the magnet. The correct gap is between 0.005-0.007, if you need to adjust it, loosen the bolt and gap it at 0.007 then retighten and recheck the gap I find it will tighten a little and be right at 0.006. Use a torque wrench tightening the bolts holding the coil pack to 36in lbs (4 Nm). These small bolts will break easily so take carenot to overtighten. Repeat for the other coil. Reconnect the ground wires to each coil.
If needed: For a horizontal motor, while you have the cowling off, drill a couple of small drain holes where water can gather in the bottom of it while the motor is in travel lock. If any of the cowling studs backed out with the 13mm bolts, just clamp on the stud with some channel locks to steady it and pop the 13mm nut loose. Reisntall the cowling studs back in the block using red loctite on them so they don't back out again, and tighten with a 12mm wrench.
8) Reinstall the cowling, make sure the sleeves around the holes in the cowling go over the studs well, if one pops out, just press it back in the hole. Make sure your spark plug wires are in the cowling slots on both sides and are not pinched by the cowling. Put the cowling up over the studs and under the heat shields on top then hand tighten the 13mm nuts to get them started.
9) Reinstall the two bolts (10mm) on both sides and get them aligned and started before you tighten the front bolts (don't forget the clamp(s) for the wiring and or fuel hose) . This will give you a little play to line up the holes in the cowling and heat shields, torque these to 90in lbs (10 Nm) or tight. Then tighten the nuts (13mm) on the front of the cowling to the same torque.
10) Reinstall the debris screen (3 Torx T-30, don't forget the bracket behind the screen) to 100in lbs (11 Nm) and 4 bolts (10mm) on the fan cage.
11) Reinstall the center cowling holding the key switch tightening the two screws until you hear a 'click'. Reinstall the outdrive vent (if applicable).
This all sounds involved but its less than an hour job.
I will post some more instructions if you have dual carbs as this is a little more involved.
If you have dual carbs you will need to remove the carbs and intake flanges before you can remove the motor cowling.
1) Remove the carbs from the black rubber intake adapters and move them out of the way.
2) Remove the two allen bolts (1/4) on the black intake adapters and remove the adapter on each side.
3) The 8 allen bolts (7/64) for the intake flange will be exposed. Remove the 8 bolts and intake flange on each side.
4) Follow the instructions above.
Clean the silicone sealant off the intake flange and adapter. For reassembly reverse the steps above. Reapply silicone sealant on the intake flange and intake adapter so you have a good seal on the carb intakes.

